Summer Internship Objective:

Every year LeMay Restorations has at least one feature car restored for their annual car show in Tacoma, WA. This year we have two 1956 Powell's. Our goal is to have these cars restored and driven onto the show field on car show day, August 28th 2010. Will we complete these cars on time? ...

Keep checking this blog to find out!

Quick Note:

LeMay Restorations is a completely separate entity from the LeMay-America's Car Museum. The two Powell's are family owned and restored at their private shop. The museum is a not for profit organization.

Tuesday, June 29, 2010

June 29- More gas tanks and a treasure find

Today was another day where I didn't feel like I really accomplished anything. I sprayed DP on the gas tank last night around 8pm and started chiseling ice out of the 1960's refrigerator we unplugged and cleaned up. This morning, there was another rust covered and dented tank sitting on my work station, just begging me to fix it up. So Tom took the grinder and cut a big section out of the top and I dunked it in the electrolysis tank. Since I couldn't do anything else past that point with the tanks, Tom had the whole crew putting up a tent for the Ultravan that is ALSO going to be done for the show. I did a lot of little things that needed to be done today. Tomorrow, tack weld, make tabs and lead another tank.
Sign above reads "you can check out any time you like, but you can never leave". We call the van "Hotel California".

Hey! I know where that is!

FOUND: Treasure. Getting ready to scrap our 1941 Plymouth car (whats left of it), and found this. We took the frame out since it was nicer than the one we had. Took off the gauge, emergency brake, those little clips that hold the firewall padding and the dimmer switch. Used my paycheck today to get a Simpson 260 series 8. Now i'll be able to test all this interesting equipment!

Sunday, June 27, 2010

June 27th- Catch up

Restoration is a very exhausting career choice! I really do love every minute, however when I get home I'd rather lay my head to rest than get on the computer. A lot has been going on in the past two weeks. The gauge cluster housing and glass is done. Both steering wheels are just in need of some rubbing compound after the paint has cured (in another week). A lot of pieces have been sand blasted and painted like the oil bath air cleaner (which also had a dent in the top), the oil pan, the engine side covers, and shocks. I also put a skim coat of icing on the fiberglass front nose of one of the Powell's. I worked on the three speedometers trying to get everything to move again, and to de-gunk the whole thing. All the speedo's move now except for one of the odometer gear shafts. For some reason it just won't budge.

I remember from Luke's drive train class that we made an electrolysis de-rusting device and it worked great! So I made one at the shop to de-rust some rear ends and now we have halves of gas tanks in there. It really works! We're not even using wash soda, we're just using some arm n' hammer laundry detergent.

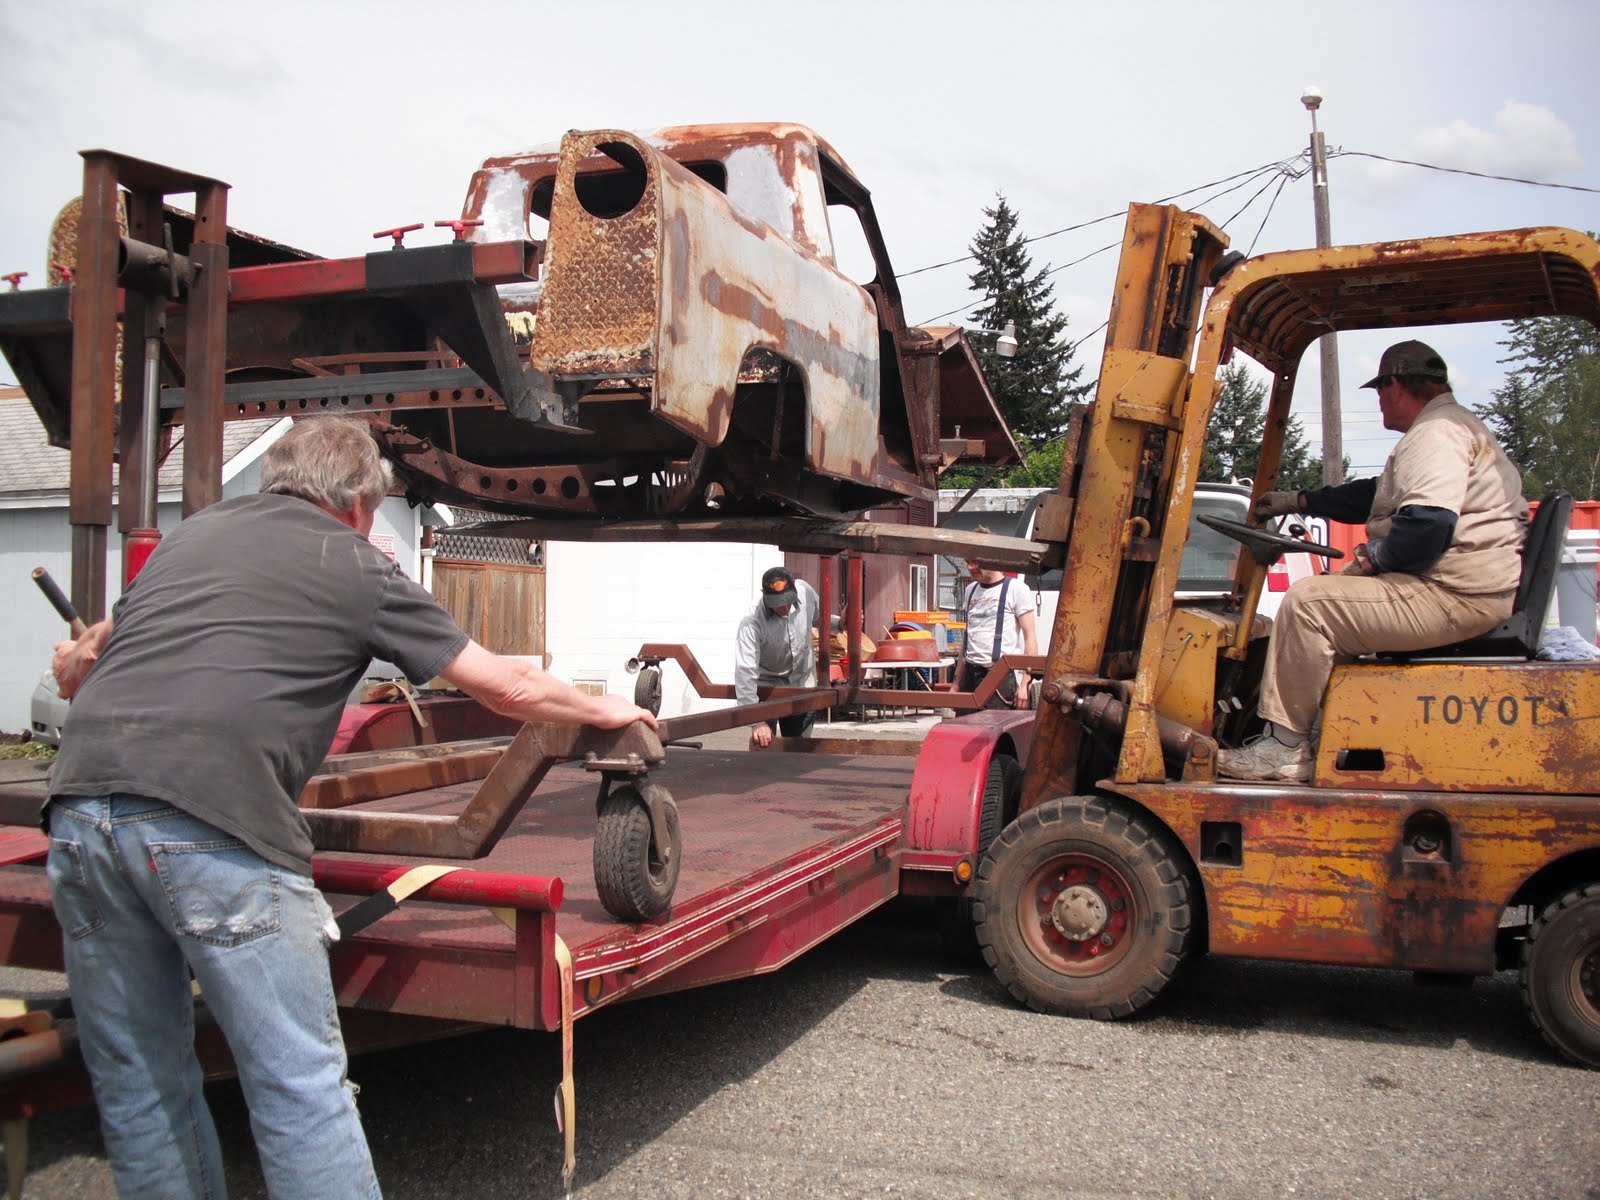
Also, in the past two weeks, I sprayed one of the frames with DP again. We finally got the truck body back from the sand blaster so we're now doing some body work on that. The window channel was really rusty and amazingly enough it had angle iron beneath it and that wasn't completely rotted out yet so its salvageable. I grinded the bottom of the window channel off and and cleaned up the welds on the cowl.

These past few days have been really interesting! I went to a couple swap meets and yard sales and picked up some goodies like an army ammo box. Tom is letting me do all the work on the three gas tanks. we grinded the tops off and cleaned them out. I tack welded it on and we're leading it up tomorrow after I tack a few more spots.

Chuck is from the Powell registry and he's been helping us by answering all of our questions regarding the Powell's like what the tire size was, how they were wired, were they 6 volt, if he knew of any resources where we could find some gauge pieces etc. He sent me a Powell car package with a gauge cluster and temp gauge cable with the ether tube still on it and some fuel sending units!

It's been super duper interesting at the shop and I'm still working about ten hours a day, six days a week. It's pretty much what I'm living for at this point. Tom is like my automotive father and he's really good at what he does and a great problem solver, which makes him a great teacher. I've learned so much from him, and there are years worth of more knowledge to get, that I have to cram into the next two months.

Still think we'll get the Powell's done in time?

Body back from sand blaster, in its new home until the body work is done


Power pose after I put "The Machine" together


Plymouth wheel painted body color, Aqua...pretty


Glass after I finished painting the numbers back on...whew glad thats done!


Tank after I tacked some tabs so the top would lay where it should without it falling. Needs a few more tacks before I can lead it.

I hope to be writing this blog more often now that I know the craziness is going to happen whether I spend the time to write this or not.

Tuesday, June 15, 2010

June 15th - Didn't sand at all

Today was another amazing day! I took the gauge cluster w/o the gauges and sand blasted them with a very fine sand. I sprayed them to protect from rust, and I sprayed them the same as I found them. The back side of the piece that holds all the gauges together was painted black in some areas and white in others. So i'm recreating that since I can only assume that it was done like that on purpose. I'm guessing the blacked out section are the gauges you pay attention to the most so they are more easily read with black on the back.

I also took the gauge faces and speedo faces to a graphics design store called Signs By Tomorrow and they are going to recreate original looking faces by using vinyl sticky stuff. As soon as I get a proof design from the store, i'll post it up so all can see. We're going with an off-white for the background of the faces, dark brown for the lines and lettering and tan and red for the rectangle area. I calculated an estimation of my time and labor for these gauges and all the pricing for the chroming and vinyl. Comparatively speaking, having me work on these gauges is way cheaper then the guy we were going to send out to. He was charging over $800 for ONE gauge cluster restored, whereas with my time and labor and outsourcing (the vinyls) each cluster is about $160! Thats one heck of a deal!

The Willy's steering wheel got painted as well!

I'm glad that project is coming closer to an end. I don't even remember what the steering wheels looked liked originally. But they look superb now!


Front glass for the gauge cluster. The back is etched so I took some sign lettering paint and painstakingly painted in the lines for the practice one. Then I wised up and found that I can scrap all of the excess off with a razor blade and It still looks fantastic. So for all three I just dropped the paint on with a toothpick.

Monday, June 14, 2010

June 14- More sanding but with a kick

Final sanding is done on both steering wheels and they're finally ready for paint! Tom said if I find out what size the tires need to be for both Powell's I don't have to sand for a while. So I outsourced it to Jeremy since he's still at the shop. I hopefully am done sanding for a while! I also took care of the steering column for one of the Powell's. I sanded it and filled in the pits with some icing stuff. It sands down really nice. Tom put another coat of primer on it and it'll be sanded down one more time before paint tomorrow.

I did get the most amazing job today. Tom already mentioned to me that I'd be helping one of the volunteers with the wiring harnesses for both vehicles, but I also get to restore both instrument clusters! I didn't get too far on them today but I took initial photographs, disassembled the gauges from the overall housing and took the faces off one of each of the gauges (amps, oil, fuel, temp, speedo). I'm going to look for a graphics company who can scan the faces and fix them up or a company that sells decals so we can get that underway. Tomorrow I might be calling up my professor about some questions, but i'm going to do some more research and get some readings with a meter before I bench test. The internals are very clean looking (no cobwebs, burn marks, pieces falling out, indications of other people messing with them etc). Tom and the other guys in the shop seemed to be impressed with my knowledge of the gauges, so I think Tom is pretty comfortable with handing this project off to me.
I have 3 of everything which all shows similar wear to the faces. If I have decals put on, they'll go on the backside of the original faces. I noticed the Speedo gauges all look a little different so it'll be up to Doug and Tom which ones will go on what car. Each Speedo face has a different number of screws holding the face on and one of them has a different face design. That one also has a different back design. More research will tell me if its a different model and/or year.

Sunday, June 13, 2010

June 11 +12 = Steering wheels 95% done!

Its been a long week but a lot happened...the groundbreaking ceremony for the museum, saying goodbye to my best friend for the summer, getting done with the steering wheels and a car show or two.
I feel like i've taken way too long on these wheels, but they were in pretty rough shape. They are looking very good now. I have them both in primer and ready for paint, but haven't taken a picture yet. But I will tomorrow morning before the paint goes on. Doug decided that both wheels were going to be painted white. A boring color but an original one. Steering wheels are what the driver look at most, since they're behind it, so I feel like they have to look perfect. Tom is probably getting frustrated with my perfectionism but he is still proud of me and I do other odd jobs in the shop.

1941 Plymouth sanded and ready for primer

Willys wheel right before 1st coat of primer

I know I'm bored of looking at these steering wheels so I put this picture up of my favorite topless car at the XXX rootbeer stand for the Susan B Komen breast cancer charity car show. It was a beautiful day to have off work and it was 80 degrees today!

Thursday, June 10, 2010

Days 8 + 9 = Painting and more sanding... and a ceremony!

June 9 + 10

I have gained more confidence here in the past 2 weeks than in the past 2 years at school- or in my entire life. At LeMay Restorations, I feel much more comfortable with the people who are around me and their willingness to help me and being kind. They have helped me immensely. I filled some rust pits in one of the differential covers with body filler, guide coated it, and sprayed it with two coats of DP. I also filled some more cracks from the Plymouth steering wheel; whatever the high build didn't fill. I was a little unsure at first if I should primer so soon, but it actually helped me find out exactly where I was in the project. The wheel is almost sanded down again and ready for one more coat of primer tomorrow. Today I only worked a half day and sprayed one coat of DP on the frame I had painted before. But since then some dents were hammered out and it was sprayed with high build primer and welded in certain spots. After I sprayed and sanded for a little while, Jeremy and his mom, Susan picked me up in a friends 1949 Ford two-door sedan (it's a pretty rough car and the clutch is practically gone) and we headed to downtown Tacoma for the grand GROUND BREAKING CEREMONY for the LeMay America's Car Museum! After 13 years, Harold E. LeMay's dream has finally started to come true. Since I am a big believer in not giving up on your dreams I thought I'd post some pics of the event, instead of more pics of me sanding something.
Above: A friend of mine, drove his car to the groundbreaking in a caravan. Hundreds of cars and car clubs showed up.

Jeremy, his mom Susan, and me

Battery Bob, and guess who?

Battery Bob once again and my mom

Shoveling the dirt in front of a 1963 Corvette and a 1930 Duesenberg. Among the shovelers are Nancy LeMay, our Mayor, Governor, and the CEO of LeMay America's Car Museum David Madeira

Wednesday, June 9, 2010

Day 7- June 8th- Still more sanding + high build primer

Above: Plymouth wheel in high build; filled most of the rest of the cracks, but will probably need a few touch ups of epoxy.

Before I left work today I finally got the Plymouth steering wheel into primer. Since we don't have a paint booth to really paint in, we painted outside since it was decent outside. I sprayed 2 coats of high build on 5 wheels and the Plymouth wheel. I really missed that crew while I was away at school so it's nice to see some of those guys drop into the shop every once in a while. Les and Richard are some of the volunteers at the museum and shop and I haven't seen them since last summer so it was good to see them.
Tom is still patient with me while I get situated in the shop. Fixing the steering wheels is just practice for when the bodies come back from the sand blaster. Tom says I will get to do a lot of block sanding. He's really pulling me out of my comfort zone, which makes me nervous at first but I know it's so I can be well rounded when I get back to school. I never painted wheels before, or block sanded a car/truck/wagon/thing, and I've never used some of those tools but this shop is a really great learning environment and everyone seems easy to talk to or ask questions about things I may need help with.

Monday, June 7, 2010

Day 6- June 7th- Very Very Very tired, of sanding too

Today I spent the day and part of the night working on the steering wheels. I sanded a lot, but got almost done with the Plymouth and the Willy's. They will both need a small skim coat of epoxy over the deep cracks that weren't completely filled the first time. By the end of the week, they'll both be in primer, and then sanded again before paint. I believe both of them are to be painted white (which is a very boring color but original is original and I can't do anything about that). It's weird that my entire purpose to working this internship, because I feel like there is no need to go home. My life rests in the hands of this job and I don't have a problem with that. Its back breaking work and I wouldn't have it any other way. I never thought I'd find out what I was suppose to do with my life, but this seems to fit real well. I worked from 8am-10pm. Tomorrow Battery Bob is going to let me use his shop so I can put a new seal in the end of my transmission. Shouldn't take too long, then it's back to work!

Sunday, June 6, 2010

Day 5- Lots of Sanding

Yesterday was a beautiful and sunny day....that won't happen again for another month! Tom used the forklift to move the frame for the wagon into a recently cleared room, where I sprayed 2 coats of DP primer. Jeremy will have a fun time grinding it off the end where we're going to weld the end of another frame onto it. For the rest of the beautiful day I opened up the doors to the wood-shop area where Tom stuck me to work on the steering wheels. The System Three epoxy made in Auburn, WA sanded AMAZINGLY. I really liked this product on steering wheels. I sanded them down with 80 grit paper to get the major stuff off and then with 120 grit to perfect the shape. Today is my day off so I'll be doing absolutely nothing for the day, except for this blog of course. I worked from 9am-4pm.
Before DP


After 2 coats of DP


Just applied System Three to the '41 steering wheel

Friday, June 4, 2010

Day 4- Where school pays off


I'll try to keep this entry short since I didn't really do much today. The body went to the sand blaster so I puttered around doing little things Tom asked me to do. I worked on the computer trying to find Kwik-Poly and Lumb-R-Grips. The Kwik-Poly is for, get this.....STEERING WHEELS! I guess it paid off that I got the opportunity to work on a 1953 Studebaker steering wheel in paint class for practice. Tom was impressed that I knew what I was talking about. We couldn't find Kwik-Poly to fill the cracks so we went with some System Three which makes a new kind of two-part epoxy made in Washington! It's the consistency of body filler so it doesn't run like Kwik-Poly, but it also takes longer to cure. So far, the internship has been a wonderful experience. The only sketchy thing is that Tom has ADD....not literally I don't think, but he jumps around a lot. He'll take me off a job, so I can do something else, and then go back to what I was doing before. It gets frustrating, but I just suck it up because Tom is a really nice guy and he knows what he's doing. Plus it gives me a break from scraping old plastic off of a 1941 Plymouth steering wheel. Tom says it'll be nice enough to spray DP primer on the frame for the wagon (truck body and frame @ sand blaster) tomorrow (another good thing about paint class, I sprayed DP on a Stutz frame). I'm only going to paint part of it because we're chopping the rear end of it off and putting on a donor cars rear frame (ours was really bad). Today I worked from 8am-5pm with a few coffee and doughnut breaks.


Some shots of the Willy's steering wheel for th Powell. I'll add the '41 when it gets further along. For measuring exact amounts...I used these wonderful tablespoons. They just so happen to be the same ones we use to make coffee with. We don't like to waste things. We're high tech in this department.

Thursday, June 3, 2010

Day 3 - Sand Blast Deadline

I don't think I've ever been so caked with rust, body filler, undercoating, dirt, and cobwebs in so little of time. Lets just say, I started taking my showers at night. Today was the day to finish stripping the body of all its excesses: body filler, and undercoating. Tom said that Don would be by at 3pm to pick up the body, which made us all start scrambling to get torches and cutters to finish the body in time. I think it helped in the end because it made us reach our deadline...barely. It took me all day to find ways to get the torch and scraper to fit in all the tiny crevices where they sprayed that undercoating. I've become an in-house master of undercoating and the ways to get it off the body. I pressure washed the body which Tom sprayed with some heavy-duty-concentrated cleaner beforehand. And just as I finished spraying it down, Don shows up with the truck to take it away. Perfect timing! A became a little more than scared when they told me how the body was to be transported. We kept the body on the rotisserie and put the whole thing on the trailer. I learned how to use the tie-down straps though, which didn't keep my nerves in check going down the road. How did I spend the rest of my day? Scraping more undercoating off of the inner fenders. Today I worked from 8am-7pm.
Jeremy taking a picture of me, so you can actually SEE me working.


above: Loading the body on the trailer...That large hole on the rear right of the Powell is actually where a tray slides out to load up tools or fishing poles or whatever you need to keep handy.
above: This picture I got from Bill, who is a very gracious volunteer. It was taken in 1977 when Harold LeMay first purchased the car for $45. We're restoring a wagon too, which will have the "Dicks TV Service" on the side.
(Quick Note: Powell's are custom bodied, but I'm pretty sure they're made by Plymouth. Kind of like how a Mercury Cougar is a Mustang power-train. Bill also sent me the history of Powell, so I will be posting up a history post in the near future. Also, to see some finished Powell's here is a link to the Powell's Registry website.
http://clubs.hemmings.com/clubsites/powellregistry/scrapbook.html

Wednesday, June 2, 2010

Day 2- Grinding not scraping

Today was another rainy 8:30-5 day at the shop. Not that I mind, I'm used to the Northwest weather by now. I started the day cleaning and grinding rust off of the drive shafts for the Powell's. Got completely done with one but the second had some dents so we got another one from the parts Powell's. Talked with a few volunteers and I'll be getting some pictures of what the cars will look like done, and the history of the Powell's, so I'll be posting that up soon. I also organized some shelves with Powell parts so their easy to find later. The rest of the day was grinding off body filler from the Powell (truck) doors and body. I used several different methods. Some were with air tools, electric tools, scrapers, and even a Bernz-o-matic. Tom (the manager) is a really great teacher in the fact that he's honest. There was some rust I left on the drive shaft and he wasn't afraid to tell me to take it back and finish grinding it off. He's also a very patient person but I work hard to get the job done. He also doesn't hover over you to make sure you do something right, but he does check on me now and then to make sure I have everything I need. He also makes sure I use different tools to do the same job so I learn how to use and have knowledge of all the tools. I end up hurting at the end of the day, but I feel accomplished and I am even more in love with what I do, mainly because I get to see the work I do and so I get a sort of instant satisfaction from that. Before there was body filler, and now there isn't.....it may not look better but we're moving in a forward or positive direction.


Before and after I grinded the filler off. The door started to oil can and showed some trim and rust holes.

Tuesday, June 1, 2010

First Day on the Job

(above) After scraping inner rear quarter.

(above) After scraping for a few hours.
(above) Before shot of undercoating.
First of all- I will figure out why these photos aren't in the right order.
Well, today was my first day. I worked from 9am-6pm with a short lunch, and two coffee breaks (which are mandatory at this shop). These are photos of the first Powell. Not sure if the other Powell to be restored is the wagon, or the other truck. I scraped undercoating mostly all day. We're trying to get the body scraped and ready to be sent to the sand blaster this week. The body is currently on a rotisserie so we can turn the body over so I can scrap better. I scraped with a torch for the hard to get curved areas, but I also used a ball peen hammer and some good ol' muscle. I got most of the undercoating off of the rear quarters, and underside of the cab. I also grinded off some rust on a driveshaft, which is in DP primer right now. I'll take some pictures and post those up soon. Tomorrow is another busy day of scraping.

Shop Layout


These pictures just give a layout of the shop where I'll be working all summer. The Manager of the shop Tom, has collected many tools and gizmos throughout his life. The shop may seem cluttered but everyone knows where everything is. The first picture is of the man-made paint booth which currently houses a client's Chevelle. The second, is of the paint hallway (Doesn't really count as a room) which houses all the paint, tape, guns, brushes, solvents, additives, and so on. The third, is of the sink, which I just find interesting because there is so much to look at and the part you need is somewhere in that shop. The fourth, is a 1949 Mercury four-door convertible. Very rare and is up on some stands for now while our main priority is the feature cars. The fifth picture is just another room in the shop where we grind, sand blast, weld and certain other various projects which will be known to me in the future as I am there longer and learn more.